
 |
| DIY embroidered top |

Last friday we talked about rich and sophisticated embroideries and how they are so popular for fall. We also saw a few tricks to obtain beautiful embroideries without actually embroider.
I couldn't wait to have my embroidered top so I made (another) peplum and today I'll show you how to make this rich embroidery in less than an hour.
You'll need:
- a top
- a centerpiece
- iron on interfacing or bondaweb
La settimana scorsa abbiamo parlato di qualche trucco per realizzare un top ricamato senza saper ricamare. Non ho resistito a realizzare subito il mio ed oggi vi mostrerò come realizzare un ricamo elaborato in meno di un'ora.
Avrete bisogno di:
- un top
- un centrotavola ricamato
- telina termoadesiva o bondaweb

Start with a top and an embroidered center piece.

Put the interfacing over the wrong side or the embroidery. The shiny side has glue on it.
Disponete la telina sul rovescio del ricamo. Quel luccichio che vedete non è altro che colla.

Iron the interfacing. The glue will melt and it will stick on the fabric.
Once the interfacing is on, the fabric won't unthread and you'll be able to cut the embroideries off without damaging them.
Stirate la telina. La colla sciogliendosi si attaccherà al ricamo. A questo punto potete tagliare via il ricamo dal centrotavola perchè non sfilerà più.

Place the embroideries wherever you want.
Differently from the classic interfacing, bondaweb is a double-sided adhesive that bond fabrics together simply by ironing. Once you place your embroideries you can iron them on and that's it,you've done!
If you haven't bondaweb you can just stich the embroideries onto the top (or use a fabric glue).
Since my embroidery is made by flowers and leaves I decided to connect them with branches so I drawn a line with a pencil and I made a basic embroidery Outline Stitch, here's how to do it:
You'll need embroidery thread. This is moulinè.
Disponete i ricami a piacimento. Bondaweb, a differenza della telina classica ha la colla su due lati quindi basterà stirare i ricami sul top per incollarli. Se avete utilizzato invece la telina cuciteli sul top oppure fissateli con una colla per la stoffa.
Visto che il ricamo che ho scelto è composto da fiori e foglie ho voluto connetterli con dei rami realizzati a punto erba. Ecco come ho fatto:
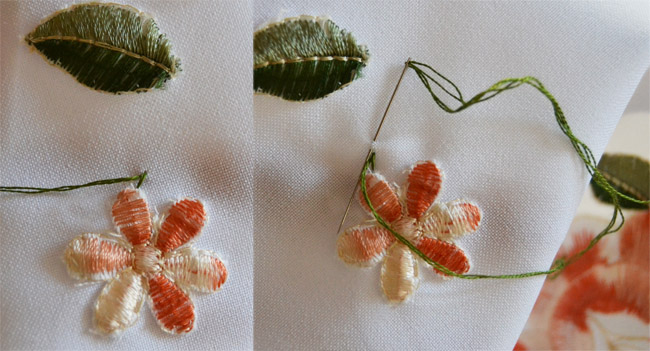
Make the first stitch and come out with the needle at the middle and repeat.
Stitches are close to each other, slightly overlapped.
Eseguite un punto ed uscite con l'ago a metà. Ripetete.
I punti sono vicini l'uno a l'altro e leggermente sovrapposti. 
This is how it looks once done.
Ecco come appare il punto una volta finito.
6 comments:
Love this trick! Fabulous as always!
Sparks In Spring
genial idea! gracias por compartir!
Sooo smart!! This is a great idea, and so inspiring :)
www.daretodiy.com
What a great idea, I never would have guessed most of it was ironed on.
xx Tanya
http://aciddreamsandsugarhighs.blogspot.com/
I love, like everything you do! I have been gorgeous!
You do beautiful work, I am impressed! Yes this trend is wonderful.
Ali of
www.dressingken.com
Post a Comment